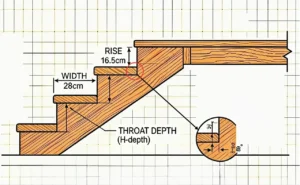




Concrete steps are durable, low-maintenance, and commonly found at entrances, porches, patios, and outdoor staircases. However, learning how to secure handrail to concrete requires a different fastening method from mounting one to a wood-framed structure. Ordinary wood screws cannot form a reliable connection in concrete, so the installation needs an anchor system designed for the concrete substrate.
Understanding how to secure handrail to concrete involves more than drilling holes and tightening bolts. The anchor type, concrete condition, base plate design, edge distance, embedment depth, and expected loads all affect the stability of the finished installation.
This guide explains how to secure handrail to concrete steps using surface-mounted posts and base plates. It covers anchor selection, concrete inspection, drilling, hole cleaning, anchor installation, and final sealing. It focuses on the concrete fastening process rather than the complete railing layout and installation process.
 a
For a broader overview of handrail types, applications, and planning considerations, see our Ultimate Guide to Handrails.
Important: A handrail is a safety-related component. The information in this guide is for general installation guidance and does not replace structural design, local building regulations, or the installation instructions for a specific anchor product. For public, commercial, or heavily used stairways, consult a qualified professional to confirm the connection design.
Why Concrete Requires a Different Fastening Approach
Concrete is strong in compression, but it can crack or break under concentrated forces. Unlike wood, concrete does not provide a material into which ordinary wood screws can form threads. A handrail therefore needs a fastening system specifically designed for concrete.
When someone leans on or pulls against a handrail, the connection between the railing and the concrete is subjected to forces that can include tension, shear, and bending. These forces are transferred through the handrail posts and base plates to the anchors and finally into the concrete.
A reliable installation depends on three main factors:
-
Concrete condition: Sound, cured concrete may support different anchor options from cracked, deteriorated, or damaged concrete.
-
Anchor selection: Mechanical anchors and adhesive anchors use different methods to transfer loads into concrete. Their suitability depends on the specific product and installation conditions.
-
Connection requirements: The base plate, anchor arrangement, concrete thickness, and expected loads must work together as a complete connection.
Before choosing an anchor, inspect the concrete and confirm that the proposed installation is suitable for the intended handrail system.
Types of Anchors for How to Secure Handrail to Concrete
Several types of anchors can be used to fasten components to concrete. The appropriate option depends on the anchor’s design, product approval, concrete condition, installation environment, and connection requirements.
The following table explains the main categories.
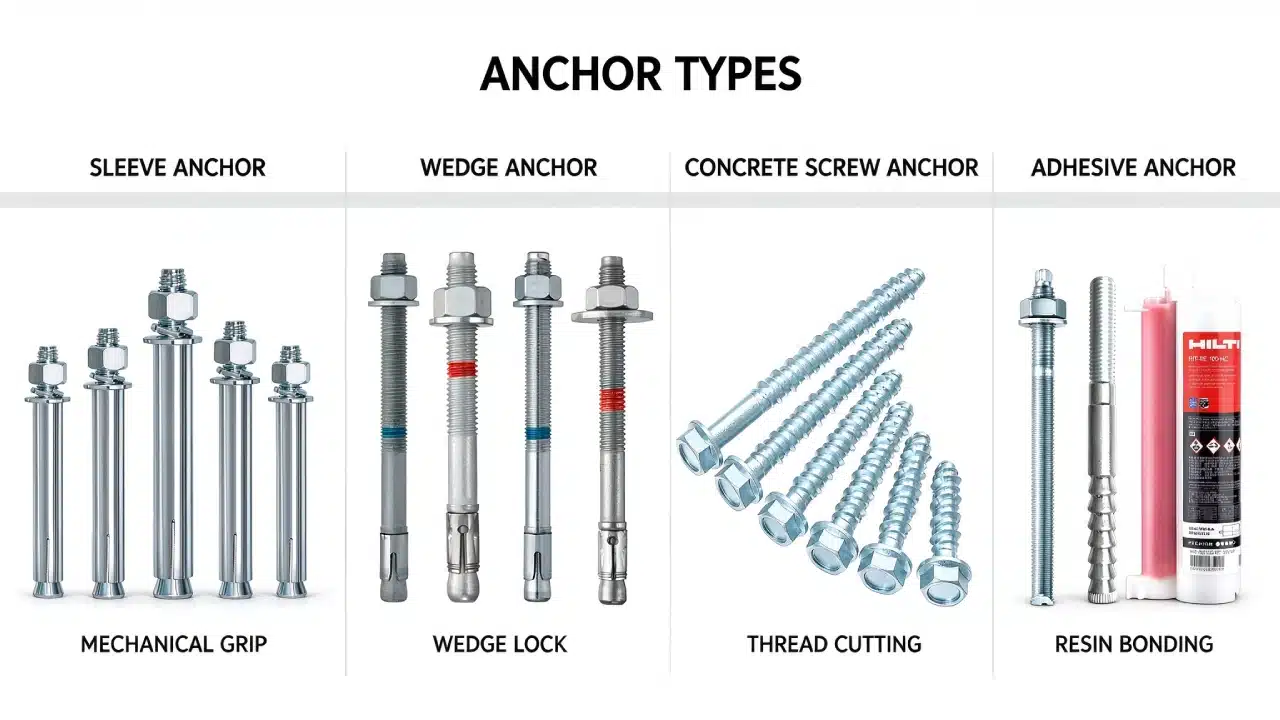
| Anchor Type | How It Works | Typical Characteristics | Important Considerations |
|---|---|---|---|
| Sleeve anchor | An expansion sleeve presses against the concrete as the nut is tightened | Mechanical fastening for suitable concrete applications | Requires the specified hole diameter, embedment, edge distance, and installation torque |
| Wedge anchor | A wedge expands against the sides of the drilled hole | Mechanical fastening commonly used for concrete connections | Must meet the product’s requirements for concrete condition, spacing, and edge distance |
| Concrete screw anchor | Threads cut or engage with the concrete as the screw is installed | Removable mechanical fastening option for approved applications | Requires the correct drill bit, hole preparation, and installation procedure |
| Adhesive anchor | A bonding adhesive secures a threaded rod or other approved element inside a drilled hole | Can provide a designed connection for specific concrete conditions | Requires precise hole cleaning, correct adhesive installation, and sufficient curing time |
Sleeve Anchors
Sleeve anchors use an expansion sleeve that presses against the surrounding concrete when the nut is tightened. They are available in different sizes and configurations for various fastening applications.
For handrail installations, the anchor must be suitable for the concrete condition and the forces expected at the base plate. Always check the manufacturer’s specifications for minimum embedment depth, edge distance, spacing, and tightening torque.
Wedge Anchors
Wedge anchors use an expansion mechanism near the bottom of the anchor. As the nut is tightened, the wedge expands against the concrete surrounding the drilled hole.
They are commonly used in concrete fastening applications, but their suitability for a particular handrail connection depends on the specific product and installation conditions. Do not assume that every wedge anchor is suitable for cracked concrete or installation close to a concrete edge.
Concrete Screw Anchors
Concrete screw anchors engage with the concrete through specially designed threads. Unlike expansion anchors, they do not rely on the same expansion mechanism.
They can be useful where a removable mechanical fastening solution is required, provided the selected product is approved for the application and the concrete conditions.
Adhesive Anchors
Adhesive anchors use a bonding material, such as an approved epoxy or other anchoring adhesive, to secure a threaded rod or approved fastening element inside a drilled hole.
They can be designed for different concrete conditions, including certain cracked-concrete applications. However, not every adhesive anchor is approved for cracked concrete, close-to-edge installations, or every type of loading.
Installation also requires careful attention to hole cleaning, adhesive mixing or dispensing, rod placement, temperature, and curing time.
How should you choose?
There is no single anchor type that is automatically the strongest or best choice for every concrete handrail installation. Compare the specific products and their technical documentation. Confirm that the selected anchor is approved for the concrete condition, loading, edge distance, spacing, embedment depth, and installation environment.
Step 1: Inspect the Steps for How to Secure Handrail to Concrete
Before drilling, inspect the concrete steps and the surrounding area. The condition of the concrete directly affects how reliably an anchor can perform.
Look for the following:
-
Cracks: Check for visible cracks near the intended anchor locations, especially cracks that extend toward the edge of a step.
-
Spalling or flaking: Loose, broken, or deteriorated concrete may not provide a reliable anchoring surface.
-
Previous anchor holes: Old or abandoned holes can affect the available space for new anchors.
-
Moisture damage: Look for signs of water penetration, corrosion, or freeze-thaw deterioration.
-
Concrete thickness: Confirm that the concrete member is thick enough for the proposed anchor and its required embedment depth.
Also consider whether reinforcement bars, electrical conduits, or other embedded services may be present in the concrete.
If the concrete is significantly cracked, damaged, or too thin for the proposed anchor, do not simply choose a larger fastener. Have the condition assessed by a qualified professional before proceeding.
Step 2: How to Secure Handrail to Concrete by Choosing the Right Anchor
Once the concrete condition has been checked, select an anchor system that is suitable for the handrail connection.
Start by checking the following information:
-
The handrail post and base plate design.
-
The number, size, and arrangement of the anchors.
-
The expected tension and shear forces on the connection.
-
The concrete condition and specified strength, where known.
-
The required anchor embedment depth.
-
The minimum concrete edge distance and anchor spacing.
-
The minimum concrete member thickness.
-
The corrosion resistance required for the installation environment.
For structural or code-regulated applications, use the applicable anchor evaluation report and design documentation. In the United States, an ICC-ES Evaluation Report may provide information about a product’s approved applications, design values, and installation conditions.
After confirming that the proposed anchor system is suitable, position the handrail base plate on the concrete step. Use the holes in the base plate to mark the anchor locations.
Before drilling, check that:
-
Each anchor location meets the specified minimum edge distance.
-
The spacing between anchors meets the product requirements.
-
The concrete is thick enough for the required embedment.
-
The proposed holes will not interfere with reinforcement or embedded services.
-
The base plate sits in the intended position without interfering with the stair surface or surrounding structure.
Do not use a universal edge-distance or anchor-spacing measurement. These dimensions vary according to the anchor product, diameter, embedment, concrete thickness, and design conditions.
Step 3: Drill the Holes for How to Secure Handrail to Concrete
After marking the anchor locations, prepare the holes using the drilling equipment specified by the anchor manufacturer.
For many concrete anchor applications, a hammer drill or rotary hammer with a suitable masonry bit is used. The quality of this step directly impacts how to secure handrail to concrete safely and effectively.
Follow these steps:
-
Select the drill bit diameter specified for the chosen anchor.
-
Confirm the required hole depth from the manufacturer’s installation instructions.
-
Mark the required depth on the drill bit if appropriate.
-
Position the drill perpendicular to the concrete surface.
-
Drill carefully to the specified depth without damaging the surrounding concrete.
The drill bit diameter and hole depth must match the anchor specifications. A hole that is too large, too small, or too shallow can prevent the anchor from developing its intended performance.
Do not assume that drilling deeper is acceptable. Excessive drilling can affect the remaining concrete thickness or interfere with reinforcement and embedded services.
If you encounter unexpected resistance, metal, or a sudden change in drilling conditions, stop and investigate rather than forcing the drill through the obstruction.
Step 4: Clean the Drilled Holes for How to Secure Handrail to Concrete
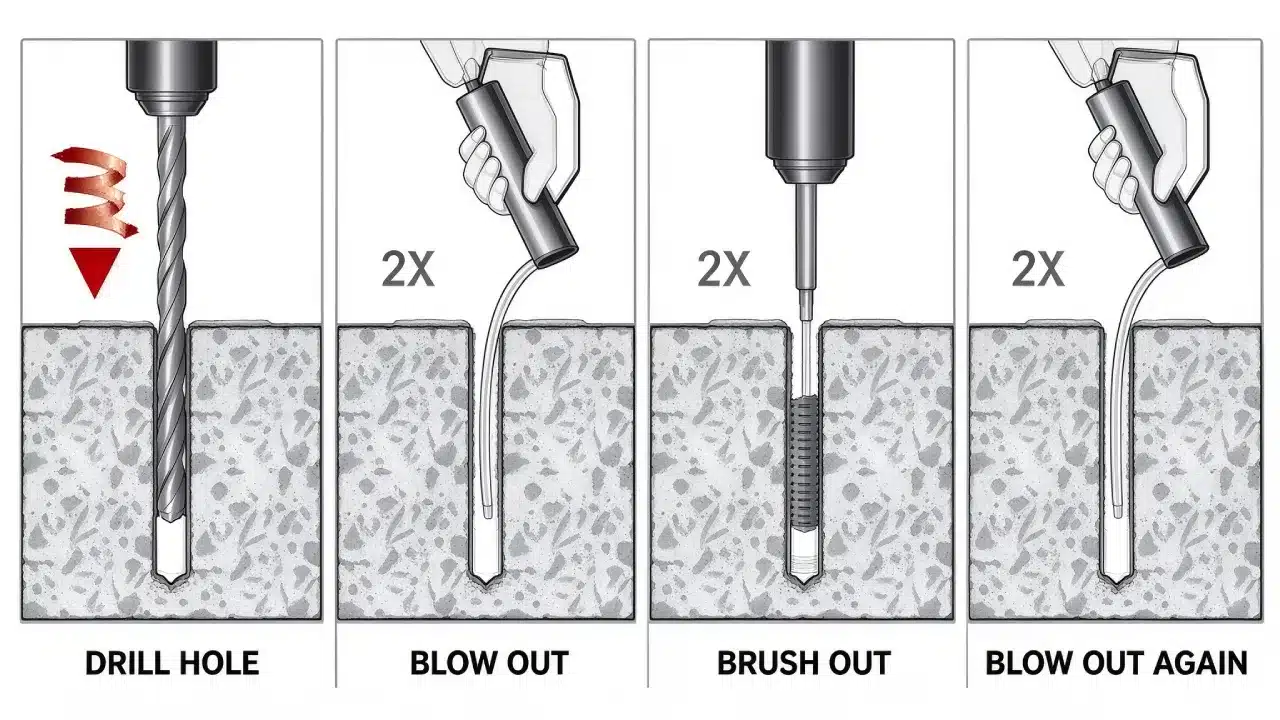
Hole cleaning is an important part of concrete anchor installation. Dust and drilling debris can interfere with the anchor’s contact with the concrete and reduce its performance.
The cleaning procedure depends on the anchor type and the manufacturer’s instructions.
-
For mechanical anchors, remove loose dust and debris using the cleaning method specified for the product.
-
For adhesive anchors, hole cleaning is especially important. The installation procedure may require a specific sequence of brushing and blowing, using the correct brush diameter and suitable air-cleaning equipment.
A typical adhesive-anchor cleaning sequence may involve:
-
Removing loose drilling dust.
-
Brushing the hole with the specified wire brush.
-
Blowing out dust and debris using the approved equipment.
-
Repeating the cleaning sequence as directed by the manufacturer.
-
Checking that the hole is ready for adhesive installation.
Do not assume that a shop vacuum alone is sufficient. Some anchor systems require a specific cleaning procedure, while others use approved systems that reduce or eliminate manual cleaning.
Always follow the instructions for the exact anchor product being installed.
Step 5: Install Anchors to Secure a Handrail to Concrete
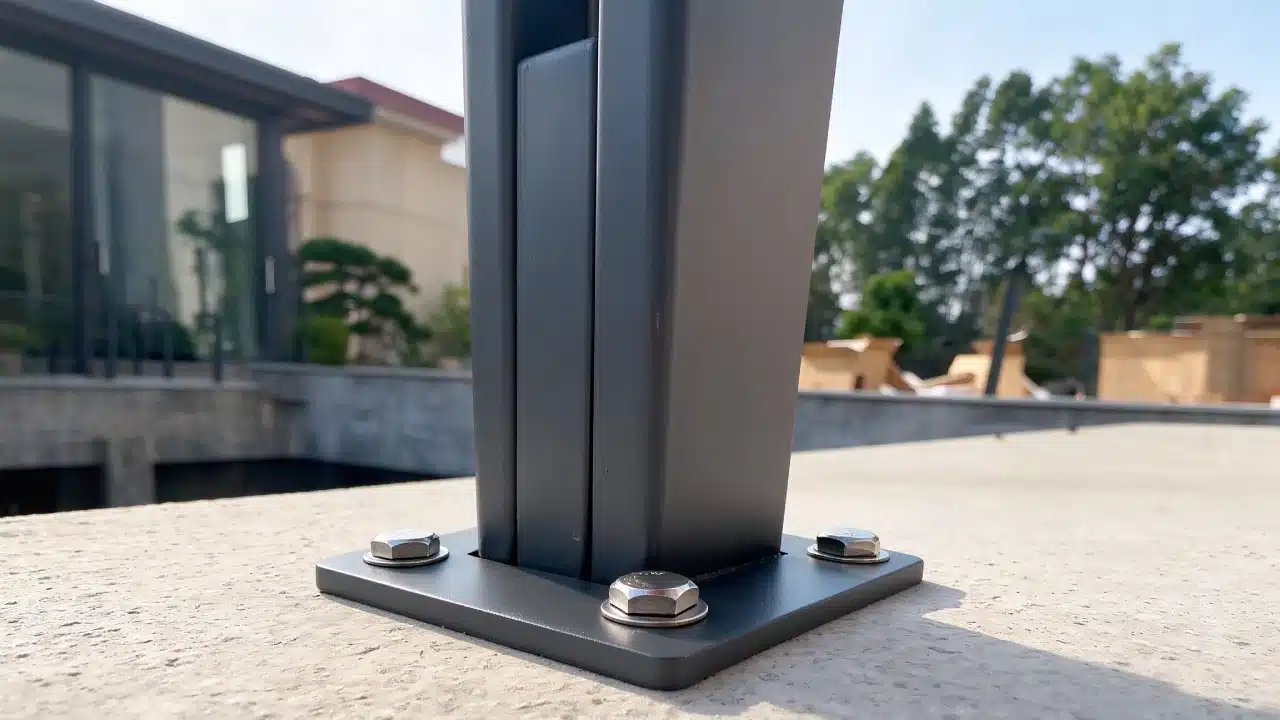
With the holes prepared and cleaned, install the selected anchor system according to the manufacturer’s instructions. This is the core step in understanding how to secure handrail to concrete, as the anchor transfers the load into the substrate.
The installation procedure differs between mechanical and adhesive anchors.
Installing Sleeve and Wedge Anchors
For suitable mechanical expansion anchors:
-
Check that the anchor, hole, and base plate are compatible.
-
Insert the anchor into the prepared hole as instructed.
-
Position the handrail base plate over the anchor locations.
-
Install the specified washers and nuts.
-
Tighten the anchors using the manufacturer’s required procedure and torque.
Use a calibrated torque wrench when the product instructions specify a tightening torque. Do not overtighten the anchors. Excessive torque can damage the anchor or the surrounding concrete.
Installing Adhesive Anchors
For an approved adhesive anchor system:
-
Confirm that the drilled hole has been cleaned according to the manufacturer’s instructions.
-
Prepare the adhesive cartridge and dispensing equipment as directed.
-
Dispense the adhesive into the hole using the specified procedure.
-
Insert the threaded rod or approved fastening element with the required movement.
-
Keep the anchor undisturbed during the specified curing period.
-
Install or tighten the base plate only at the stage permitted by the product instructions.
The curing time depends on the adhesive, temperature, concrete condition, and installation environment. Do not apply loads or tighten components prematurely.
Aligning and Leveling the Base Plate
Before completing the connection, check that the base plate and handrail post are correctly aligned.
If the concrete surface is uneven, use an approved leveling or grouting method suitable for the base plate and anchor system.
Do not use loose washers or improvised shims as a universal solution for correcting an uneven concrete surface. An unsuitable leveling arrangement can compromise the connection.
Once the base plate is correctly positioned, complete the fastening procedure according to the anchor manufacturer’s instructions.
Step 6: Seal the Base Plate After You Secure Handrail to Concrete
For outdoor handrail installations, water can collect around the base plate and enter the gap between the metal components and concrete. Final sealing is the last crucial step in how to secure handrail to concrete for long-lasting durability.
After the connection has been correctly installed, an appropriate exterior-grade sealant may be applied around the base plate where the design and installation instructions allow it.
When sealing the base plate:
-
Choose a sealant suitable for outdoor exposure.
-
Confirm compatibility with the concrete and railing materials.
-
Follow the sealant manufacturer’s surface-preparation instructions.
-
Apply the sealant around the appropriate perimeter and exposed gaps.
-
Allow the sealant to cure according to the product instructions.
For metal handrails, also consider the corrosion resistance of the base plate, anchors, washers, and exposed fasteners.
Remember: Sealant provides weather protection. It does not replace structural anchoring and cannot compensate for loose anchors, damaged concrete, or an inadequately designed connection.
Những sai lầm phổ biến cần tránh
Even when the correct tools are available, mistakes during concrete anchor installation can reduce the reliability of the finished handrail.
-
Drilling Too Close to the Concrete Edge: Anchors installed too close to a concrete edge can cause cracking or concrete breakout. Always check the minimum edge distance specified for the selected anchor and connection design.
-
Choosing an Anchor Without Checking Its Approval: Not every concrete anchor is suitable for every concrete condition or loading situation. Check the product’s technical documentation and evaluation report where applicable.
-
Using the Wrong Drill Bit or Hole Size: The drill bit diameter must match the anchor manufacturer’s specifications. An incorrectly sized hole can affect the anchor’s installation and performance.
-
Skipping the Hole-Cleaning Procedure: Dust and debris can reduce anchor performance, particularly for adhesive systems. Follow the required cleaning sequence rather than relying on an incomplete cleaning method.
-
Over-Tightening Mechanical Anchors: Applying more torque than specified can damage the anchor or concrete. Use the manufacturer’s required torque and installation procedure.
-
Loading Adhesive Anchors Before They Cure: Adhesive anchors need sufficient curing time before they can be loaded. Premature tightening or loading may compromise the connection.
-
Ignoring the Condition of the Concrete: A new anchor cannot automatically make deteriorated concrete suitable for a handrail connection. Cracked, spalled, or weak concrete may require repair, redesign, or professional assessment.
-
Treating Sealant as a Structural Fixing Method: Sealant can help protect the base plate from water, but it cannot replace correctly selected and installed concrete anchors.
Các câu hỏi thường gặp
Q: Can I use a regular drill to secure a handrail to concrete?
A: A hammer drill or rotary hammer is generally more suitable for drilling anchor holes in concrete. A standard drill may work in some softer materials or with certain approved products, but it is often slower and may not be appropriate for the specified anchor installation. Always use the drilling equipment and bit recommended by the anchor manufacturer.
Q: How deep should I drill into concrete for a handrail anchor?
A: The required hole depth depends on the anchor type, diameter, embedment depth, and concrete conditions. Follow the manufacturer’s installation instructions for the exact product. The drilled hole may need to be deeper than the effective embedment depth to accommodate drilling debris, but the required allowance must come from the product instructions. Do not use one universal drilling depth for all concrete handrail anchors.
Q: Can I secure a handrail to cracked concrete?
A: Some mechanical and adhesive anchor systems are specifically approved for use in cracked concrete. However, approval depends on the individual product and its evaluation documentation. Before installation, check the concrete condition, anchor approval, embedment depth, edge distance, spacing, and expected loads. If the concrete has significant cracks, spalling, or deterioration, have the connection assessed by a qualified professional.
Q: Can I install a handrail on concrete without drilling?
A: A surface-mounted handrail post with a base plate normally requires a designed mechanical or adhesive anchoring system that connects the base plate to the concrete. Simply applying construction adhesive or sealant beneath the base plate is not a substitute for a properly designed structural connection.
Q: How far should a concrete anchor be from the edge of a step?
A: There is no single edge-distance measurement that applies to every concrete anchor. The required distance depends on the anchor model, diameter, embedment depth, concrete thickness, loading, and whether the concrete is cracked or uncracked. Always follow the product’s technical documentation and the approved connection design.
Q: Are adhesive anchors better than mechanical anchors for handrails?
A: Not necessarily. Adhesive and mechanical anchors use different fastening principles, and both types have products designed for specific concrete applications. The best option depends on the concrete condition, expected loads, installation environment, edge distance, spacing, and product approval.
Kết luận
Understanding how to secure handrail to concrete steps requires more than drilling holes and tightening fasteners. The concrete condition, anchor selection, base plate design, hole preparation, embedment depth, and installation procedure all contribute to the reliability of the finished connection.
By inspecting the concrete, choosing an approved anchor system, following the correct drilling and cleaning procedures, and completing the installation according to the manufacturer’s instructions, you can create a more dependable handrail connection.
If you are planning a complete railing project, including measuring, post layout, and railing system selection, see our guide to putting up a stair railing. For a broader understanding of handrail systems and their applications, visit our Ultimate Guide to Handrails.