


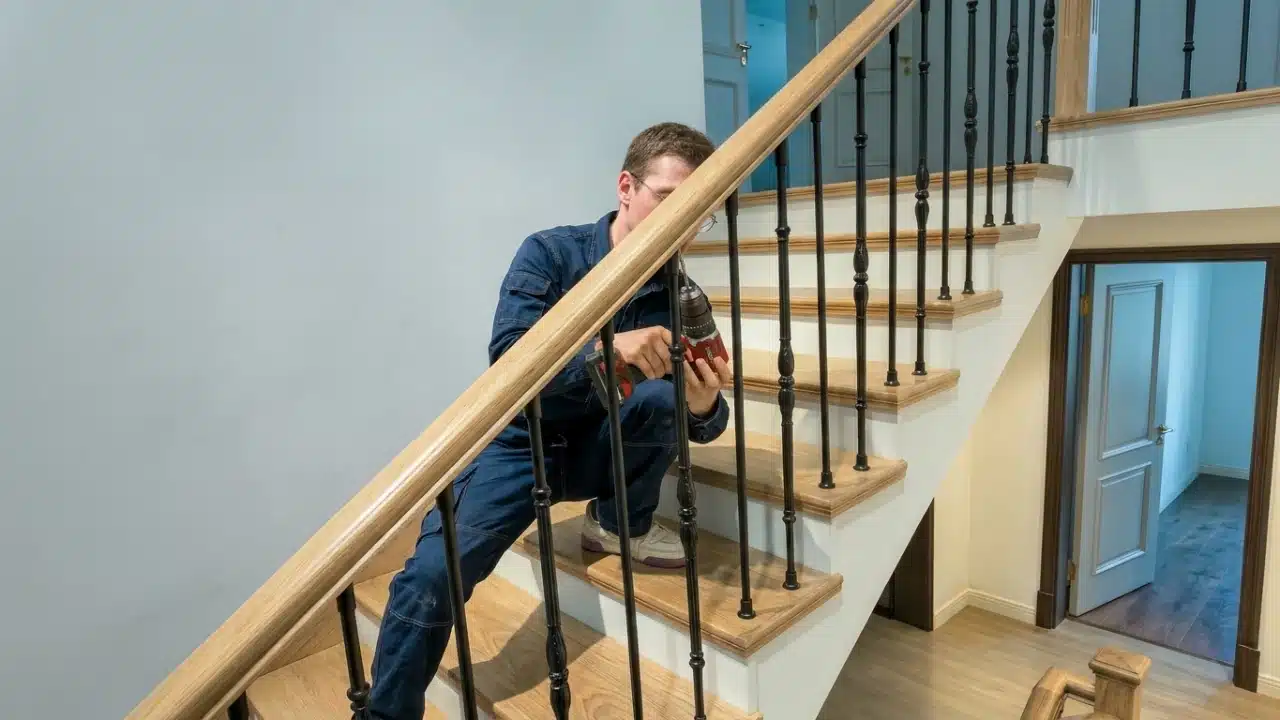
Putting up a stair railing is one of the most effective safety upgrades you can make to a home or commercial building. For confident DIY homeowners, some straightforward railing installations may also be manageable projects. A properly installed railing provides stable support, helps reduce the risk of falls, and gives people greater confidence when using the stairs.
Whether you are replacing an old, wobbly banister or installing a new railing from scratch, the process involves several key stages: planning and measuring, preparing the mounting points, installing the supporting structure, assembling the handrail and infill in the sequence required by the selected system, and checking the completed assembly for stability and code compliance.
This guide covers the complete process of putting up a stair railing. It provides an overview of the full installation rather than an in-depth tutorial for every wall type, material, or fixing method. Where a specific installation scenario requires additional technical detail—such as concrete anchoring, wall fixing, or glass base systems—you should refer to guidance designed for that particular system. The goal is to help you understand how the components work together, which decisions matter most, and how to avoid common mistakes that can result in an unsafe or unstable railing.
This article is part of our comprehensive Ultimate Guide to Handrails, which covers handrail materials, styles, components, and installation across a wide range of applications.
Handrail vs. Stair Guardrail: What Are You Installing?
A stair railing system may serve two different safety functions, and the distinction matters when selecting components, planning the installation, and checking building code requirements.
A handrail is the rail people grasp for support and balance when using the stairs. Its height, graspability, and continuity are regulated in many jurisdictions, but its primary purpose is to provide a secure gripping surface.
A guardrail, sometimes called a stair guard, is a barrier designed to prevent people from falling from an open side of a staircase, landing, or elevated walking surface. Guardrails have their own height, infill, opening, and load requirements, which are separate from handrail requirements.
Some staircases need both: a handrail for support and a guardrail along the open side for fall protection. In some installations, the handrail and guardrail are separate components. In others, one railing system may perform both functions, but only if it satisfies the requirements for each.
This guide covers both functions, but they are not interchangeable. A handrail height that meets the applicable requirement does not automatically satisfy guardrail requirements, and vice versa. Confirm which functions your project requires before choosing a railing system.
Types of Stair Railing Systems
Before you begin, it helps to understand the type of railing system you are installing. The installation sequence depends on how the railing is supported, the structure it connects to, and the type of infill it uses.
| System Type | How It Is Supported | Typical Infill Options | Typical Application |
|---|---|---|---|
| Wall-mounted handrail | Brackets fixed to a wall or structural backing | None; the handrail is supported by wall-mounted brackets | Stairwells with a wall on one or both sides |
| Post-mounted railing | Newel posts anchored to the stair structure or floor | Wood balusters, metal balusters, cable, or glass panels | Open staircases, decks, and porches |
| Hybrid system | A wall-mounted handrail on the enclosed side and a structurally supported guardrail on the open side | Wood, metal, cable, or glass on the open side | Staircases with a wall on one side and an open edge on the other |
Choosing the Right System for Your Project
Different railing systems have different installation requirements. Consider the structural support available, the staircase layout, and the intended use before selecting a system.
| System Type | Installation Complexity | Structural Requirement | Typical Use Case |
|---|---|---|---|
| Wall-mounted handrail | Lower; relies on wall connections | Wall must contain suitable studs, blocking, or other structural backing | Stairwells with a solid wall |
| Post-mounted railing | Higher; requires secure post connections | Stair structure or floor must support the post loads | Open stairs, decks, and porches |
| Hybrid system | Medium to higher; combines different support methods | Both suitable wall backing and structural support for the open-side railing | Stairs with one wall and one open side |
Wall-mounted handrails rely on the wall structure for support. The critical question is whether the wall contains wood studs, structural blocking, or another suitable backing material. Drywall alone is not a secure structural anchor for a safety-critical handrail.
Post-mounted railings rely on the newel posts and their connections to the stair framing or supporting structure. Hybrid systems combine different support methods, so each connection point must be assessed separately.
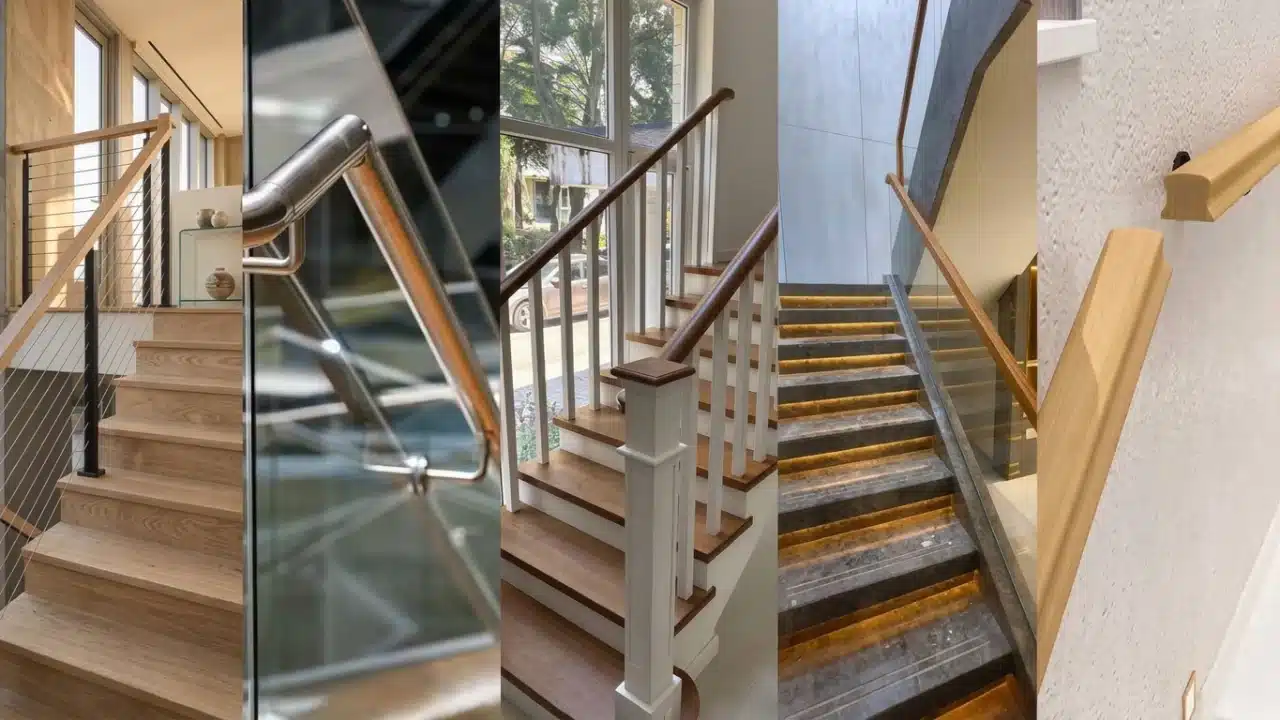
The infill choice also affects the installation process. Baluster-based systems are assembled piece by piece or in sections. Glass systems may use base shoes, spigots, or standoff fittings, while cable systems use tensioned elements and specialized end fittings. These differences affect how the components are positioned, secured, and connected.
This guide covers the general installation stages for these systems, with an overview of infill options in Step 5.
Tools and Materials
The tools and materials you need depend on the railing system, the mounting substrate, and the components being installed. The table below groups common items by category rather than assuming that every installation requires the same equipment.
| Tool Category | Examples | When Needed |
|---|---|---|
| Measuring tools | Tape measure, chalk line, level, angle-measuring tool | All installations |
| Drilling tools | Drill and drill bits matched to the substrate | Most installations |
| Cutting tools | Miter saw, suitable metal-cutting equipment | When the handrail or infill requires cutting |
| Anchoring hardware | Structural screws, approved masonry anchors, concrete anchors, and other fasteners specifically rated for the substrate and required loads | Selected according to the wall or structural material |
| Railing components | Handrail, brackets or posts, infill, connectors, and end fittings | Depending on the system |
| Safety equipment | Safety glasses, work gloves, and other appropriate protective equipment | All installations |
| Finishing materials | Wood filler, plugs, touch-up finish, and sealant where appropriate | When working with wood or finished components |
Different wall and structural conditions require different fasteners. Do not substitute ordinary drywall anchors for structural screws when the handrail needs to be secured to studs or structural backing.
For concrete, masonry, steel, and other substrates, use fixing systems specifically designed and approved for the material and the required loads. If a hollow-wall installation is unavoidable, the fixing method must be supported by a verified structural design and appropriate product load ratings. It should not be treated as a routine substitute for structural backing.
Step 1: Plan and Measure the Staircase
Start by measuring the staircase and identifying the railing layout when putting up a stair railing. Accurate measurements help determine the required railing length, component positions, and installation method.
Record the following:
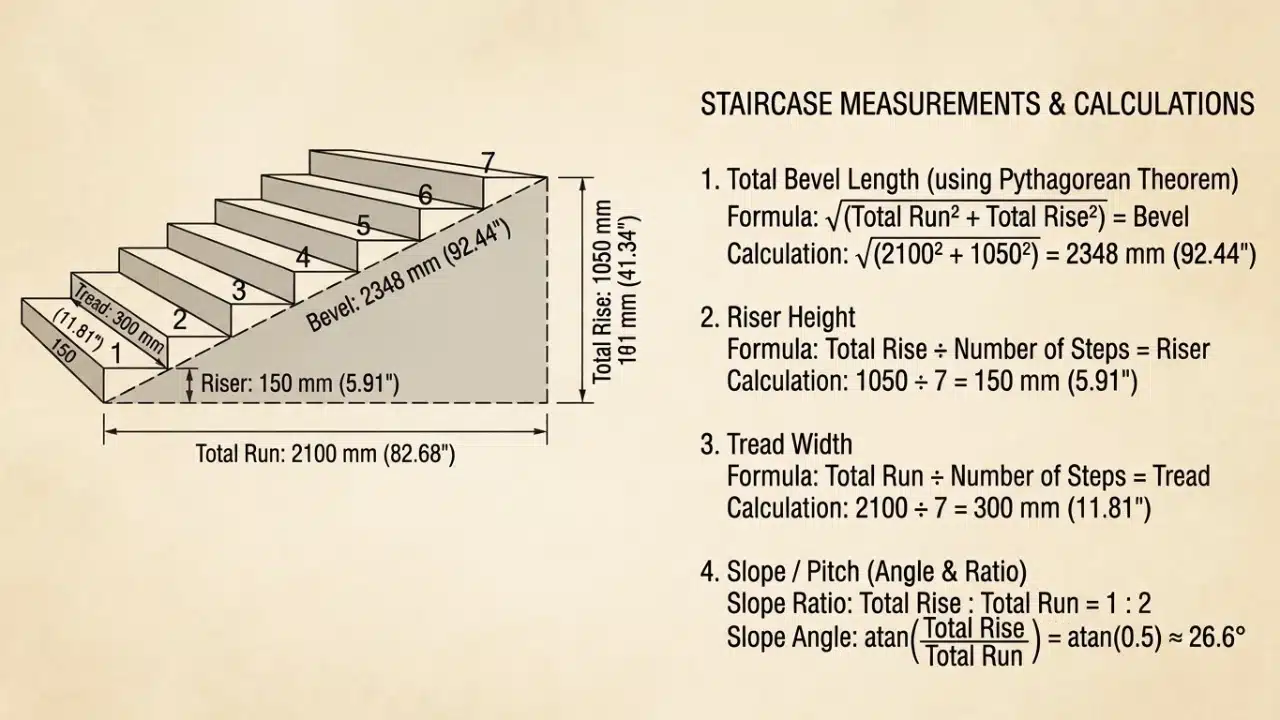
Total stair rise: The vertical distance from the bottom to the top of the stair flight.
Horizontal run: The horizontal distance covered by the stair flight.
Stair slope: The angle of the staircase, which affects the handrail alignment and component positioning.
Landing dimensions: The size and layout of any intermediate or top and bottom landings.
Required railing length: Measure each section of the railing, including any returns, turns, or transitions.
For staircases with turns or intermediate landings, measure each section separately rather than relying on a single diagonal measurement. A helper can make measuring easier, especially when checking the length along the stair slope.
If you need to calculate the stair angle, use the recorded rise and run rather than relying on an assumed standard. For most residential stairs, the rake angle falls within a typical range, but actual measurements matter more than assumptions.
If you are replacing an existing railing, measure the old rail’s length and angle as a reference, then verify them against the new railing system’s requirements. Do not assume the existing dimensions or installation method are suitable for the replacement.
Check the Structural Support Before Ordering
Before ordering components or cutting anything, confirm that the mounting locations can support the railing system you plan to install.
Identify whether the staircase has a structural wall, stringer, floor framing, concrete substrate, or another suitable supporting structure.
Check whether the existing framing or wall structure can support the selected railing system, including the handrail, posts, and infill.
For post-mounted and glass systems, verify that the supporting structure can accommodate the complete assembly and its required loads, not just the handrail.
Confirm the mounting locations and fixing methods before ordering or cutting components.
This check is more important than any single tool. A railing that is correctly assembled but anchored to an inadequate structure will not be safe.
At this stage, also confirm the railing height and other applicable requirements for your location. Requirements vary by country, region, and building type, as explained in Step 2.
Step 2: Confirm Handrail and Guardrail Height Requirements
Handrail height and guardrail height are measured and regulated separately. Do not use one height requirement for both.
For a wall-mounted handrail: Mark the required handrail height at the top and bottom of the stair flight. Use a chalk line to establish the reference for bracket placement. The exact measurement method and permitted height range must follow the applicable local requirements.
For post-mounted and glass railing systems: Determine the post, infill, and top rail positions according to the selected system’s design and applicable guardrail requirements. The position of the top rail must not be based solely on the handrail height.
Handrail Height
In many building codes, stair handrail height is measured vertically from the line connecting the stair tread nosings to the top of the gripping surface. However, measurement methods and permitted height ranges can vary by jurisdiction, building type, and applicable code edition.
Always refer to the local requirements that apply to your project.
Guardrail Height
Guardrail height is generally measured vertically from the applicable adjacent walking surface. For stair flights, the measurement reference may differ from the one used on level landings, depending on the local building code.
Always check the measurement method specified by the regulations applicable to your project.
Height requirements vary by country, region, and building type. The next section explains why checking local building codes is essential before installation.
Building Codes and Stair Railing Requirements Around the World
Building codes for stair railings vary by country, region, building type, and intended use. Requirements may cover:
Handrail height, graspability, and continuity
Guardrail height and opening limitations
Structural load resistance and anchoring
Baluster and infill spacing
Glass type, thickness, and supporting systems
Requirements for stairs, landings, ramps, and elevated walking surfaces
Requirements may also differ between residential, commercial, and public buildings. A railing system suitable for a private home may not automatically meet the requirements for a commercial staircase, workplace, or public building.
In the United States, residential projects commonly refer to the locally adopted International Residential Code (IRC), while accessibility requirements may also involve the ADA Standards. The applicable requirements depend on the building type, project conditions, and locally adopted code provisions.
In Australia, projects should be checked against the applicable National Construction Code (NCC) and relevant state or territory requirements.
In the United Kingdom and other European markets, national building regulations and applicable technical standards must be considered. Requirements should not be assumed to be identical across all European countries.
Across Southeast Asia and the Middle East, stair railing requirements differ from one country to another and may also depend on building type, local building codes, and approval requirements. There is no single standard that applies across either region. Before selecting or installing a railing system, always check the applicable national regulations and confirm any additional requirements with the local building authority or a qualified building professional.
Before purchasing components or starting installation, confirm which regulations apply to your specific project. Do not assume that a railing height, opening limit, or installation method permitted in one country will automatically comply in another.
Step 3: Mark Installation Points
Once the railing layout and required heights have been confirmed, mark the installation points for the brackets, posts, or other support components.
For Wall-Mounted Brackets
A common approach is to place brackets near the ends of the handrail and at intervals along the span. The exact spacing depends on the handrail material, bracket design, rail length, and manufacturer’s instructions.
Do not apply a single spacing rule to every installation. A rigid metal handrail may have different support requirements from a wood handrail, and some bracket designs require closer placement to provide adequate support.
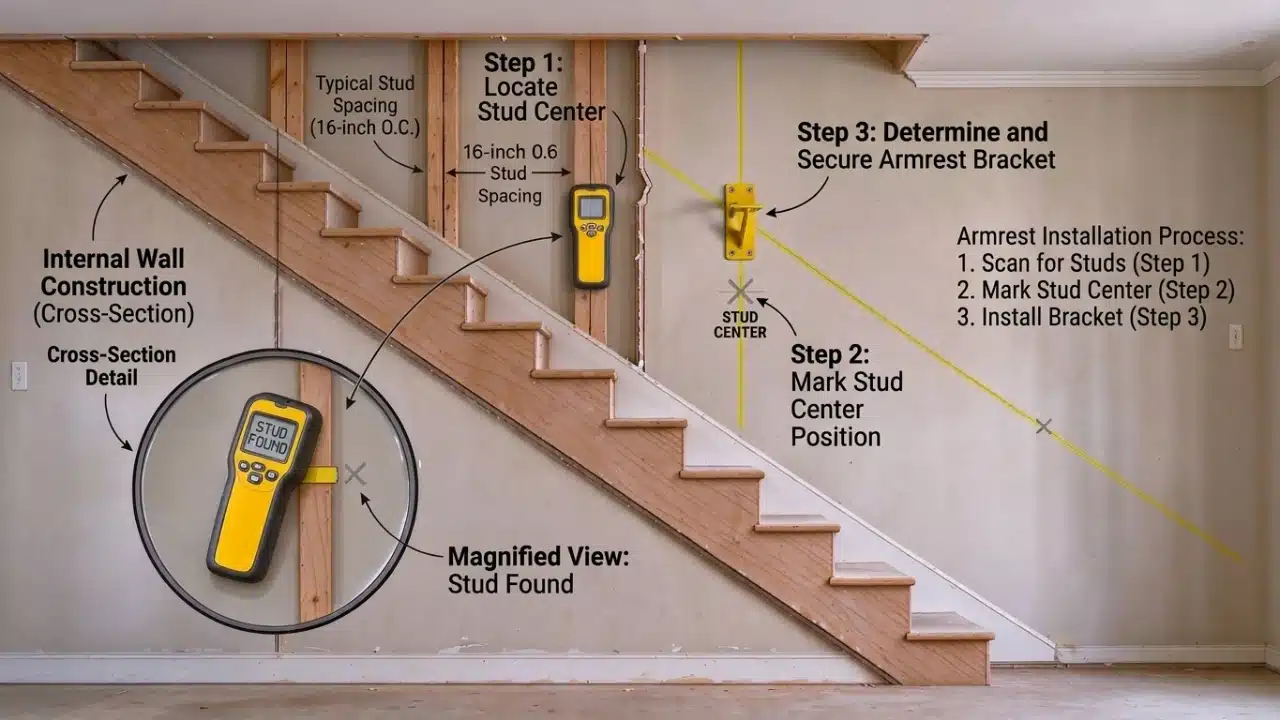
At each marked location, check what is behind the mounting surface. For timber-framed walls, use a stud finder to locate studs or structural blocking. If a bracket location falls between studs, adjust the position where possible or use a fixing method specifically designed for the wall construction and required loads.
Drywall anchors alone are not adequate for a handrail that people will lean on.
For Post-Mounted Railings
Mark the newel post locations according to the railing layout and the supporting structure. Posts may be required at the bottom and top of the stair flight, at turns, around landings, or at other points specified by the railing system.
Confirm that each post can be securely connected to the stair framing or supporting substrate. The post positions must also allow the infill and handrail to be installed correctly.
Step 4: Install Posts or Wall Brackets
This step covers the installation of the supporting structure. The approach depends on the railing system.
For Wall-Mounted Handrails
Attach the brackets to the wall at the marked locations. If you are using adjustable or swivel brackets, leave the relevant locking mechanism loose at this stage so you can align the handrail with the stair slope before final tightening.
Use fasteners that are suitable for the wall construction and required loads. Where the wall is timber-framed, secure the brackets to studs or suitable structural blocking rather than relying on the drywall surface.
The specific fixing method depends on the wall material, bracket design, and available structural backing. For bracket selection and product options, see our guides:
For Post-Mounted Railings
Anchor the newel posts to the stair structure or floor using a connection system designed for the supporting material and required loads.
Post connections must be secure. A loose newel post can make the entire railing unstable, regardless of how well the handrail is attached.
The anchoring method varies with the substrate, such as timber framing, concrete, steel, or masonry. Select the appropriate fixing system and follow the manufacturer’s installation instructions and any project-specific structural requirements.
At the end of this step, you should have secure mounting points—brackets or posts—ready for the remaining railing components.
Step 5: Putting Up a Stair Railing Infill
The installation sequence varies by railing design. Some systems require the handrail or top rail to be installed before the infill, while others require the infill to be positioned first. Always follow the manufacturer’s installation instructions and the requirements of the selected system.
Railing infill is the material or assembly that fills the space between the handrail or top rail and the supporting structure. The installation method depends on the infill type.
Baluster-Based Infill
Wood or metal balusters are installed individually or in assembled sections, depending on the railing system.
Spacing is a safety dimension, not simply a design preference. The applicable opening limitation depends on the local building code, building type, and intended use of the staircase.
Before installation, confirm the required spacing and make sure the balusters can be securely connected to the supporting structure and handrail or bottom rail.
Cable Infill
Cable railing systems use tensioned horizontal or vertical cables, supported by posts and specialized end fittings.
The cables must be tensioned correctly, and the end fittings and supporting posts must be secure. Cable spacing, tension, and connection details are system-specific and should follow the manufacturer’s instructions and applicable local requirements.
Glass Infill
Glass railing systems use several mounting approaches. The installation method and structural requirements differ by system.
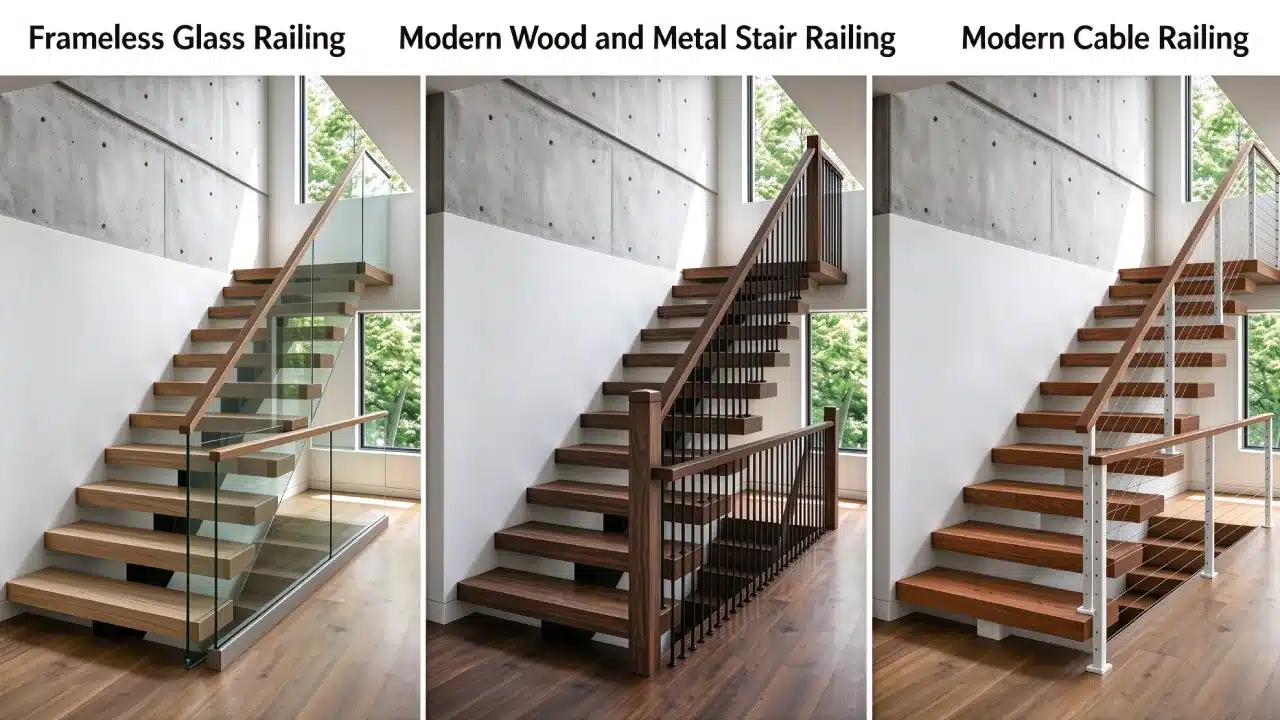
Base shoe system: A continuous channel anchored to the supporting structure holds the bottom edge of the glass panels. The base shoe and its anchoring system must be designed for the required loads and secured to a suitable structural substrate, such as properly designed timber framing, concrete, or steel.
Spigot-mounted system: Glass panels are held by individual spigots anchored to the stair or floor structure. Each spigot must be securely fixed to a suitable substrate and correctly aligned.
Standoff-mounted system: Glass panels are fixed to a supporting wall or structure using standoff fittings. The supporting substrate and fixing system must be capable of transferring the required loads.
Glass must be safety glass—tempered or laminated—as required for the application and local regulations. The glass thickness, supporting system, fixing hardware, and overall structural performance must be designed and verified for the intended use.
Do not select glass panels based on appearance alone. The complete railing assembly, including the glass and its supporting components, must be suitable for the required loads and installation conditions.
Step 6: Attach and Secure the Handrail when Putting Up a Stair Railing
Once the supporting structure and infill components are ready, install the handrail according to the requirements of the selected railing system. Depending on the design, the handrail may need to be installed before some infill components rather than after them.
If the handrail is supplied as a continuous length, measure and cut it to the required length and angle. Test-fit the rail before final fastening.
For round handrails, the rail may slide through bracket openings or sit in a cradle, depending on the bracket design. For flat-bottom handrails, the rail generally sits in the bracket seat or designated fixing area.
Adjust the brackets or connectors so the handrail follows the stair slope evenly. A rail that sits at an inconsistent angle or has noticeable high and low points may feel unstable and look incorrect.
Once the alignment is correct, tighten all locking mechanisms and fasteners according to the manufacturer’s instructions. Check that the handrail is properly supported along its length and that the connections do not interfere with the required gripping surface.
If you are working with a wood handrail and want material-specific guidance, our Oak Handrail Guide covers wood selection, profiles, and finishing considerations.
Step 7: Check Stability and Code Compliance after Putting Up a Stair Railing
After assembly, inspect the completed railing. Apply controlled manual pressure along the handrail in multiple directions to identify loose connections, movement, or visible flexing at the mounting points.
A properly installed railing should feel secure, with no obvious wobble, shifting, or looseness. If you detect movement, identify the source. Possible causes include a loose bracket fastener, an insecure post connection, or a mounting point that has not reached suitable structural backing.
This manual check can help identify loose connections, but it does not verify the railing’s structural load capacity. Where required, load resistance must be demonstrated through an appropriate engineered design, tested system, or formal inspection.
Final Installation Checklist
Before considering the installation complete, check the following:
Handrail height is consistent along the stair and within the applicable local requirements.
The handrail is continuous and extends as required at the top and bottom.
Guardrail height and infill meet the applicable fall-protection requirements.
Baluster or infill spacing meets the applicable opening limitations.
Glass panels are securely held by the supporting system, and the complete assembly is suitable for the application.
All fasteners are properly secured, with no visible looseness or movement during the manual stability check.
The railing follows the stair slope smoothly without abrupt or unintended changes in angle.
All connections and exposed components are finished in accordance with the manufacturer’s instructions.
This is a functional check, not a substitute for a formal inspection or structural assessment. If your project requires a permit, engineering approval, or inspection, confirm compliance with the relevant local authority before considering the job complete.
Replacing an Existing Stair Railing
If you are replacing an old railing rather than installing a new one, the process includes an additional removal and inspection stage.
First, remove the old handrail, brackets, infill, and any base components that need to be replaced. Inspect the mounting points carefully. Old fasteners may have enlarged holes, damaged the surrounding material, or left behind corrosion or other deterioration. Repair or reinforce those areas as necessary before installing new hardware.
Measure the old railing’s length and angle as a starting reference, but verify the measurements against the new railing system’s requirements. Do not assume the old installation was correct. An existing railing may have been installed below current height requirements or with inadequate anchoring.
If the existing posts are structurally sound, correctly positioned, and compatible with the new railing components, they may be reusable. However, inspect them for stability, damage, and correct height before deciding to retain them.
A new handrail attached to inadequate posts will not create a secure railing system.
Installing Outdoor Stair Railings: What Changes?
Outdoor stair railings follow the same general installation principles as indoor railings, but exposure to weather and environmental conditions adds several considerations.
Moisture and weather exposure: Fasteners, anchors, and railing materials must be suitable for the local exposure conditions. Corrosion-resistant stainless steel or other approved exterior-grade hardware may be appropriate, depending on the environment. Standard untreated steel may corrode when exposed to moisture.
Compatibility between materials: Consider compatibility between different metals to reduce the risk of galvanic corrosion, especially in coastal or high-humidity locations. The selected fasteners, brackets, and railing components should be suitable for use together.
Freeze-thaw and substrate movement: In colder climates, concrete and masonry substrates may be affected by freeze-thaw cycles. Cracking or movement can affect anchor performance, so the condition of the supporting structure should be checked before installation.
Building code differences: Outdoor railings may be subject to different height, load, and material requirements from indoor railings, depending on the jurisdiction and the type of structure.
Outdoor installations should use materials, finishes, and fixing systems designed for the expected environmental conditions. The supporting structure and anchoring method must also be suitable for the loads and exposure conditions of the project.
Common Mistakes When Putting Up a Stair Railing
Even a well-designed railing can become unsafe if it is installed incorrectly. Avoid these common mistakes:
Mounting only into drywall. A handrail bracket must connect to suitable structural backing. Drywall alone is not a suitable structural anchor for a safety-critical handrail.
Confusing handrail and guardrail requirements. Handrail height and guardrail height are measured from different reference points in many codes. They serve different functions and must be checked separately.
Using one measurement for every railing section. Staircases with turns, landings, or changes in direction require separate measurements and careful planning. Do not rely on a single diagonal measurement for a complex layout.
Installing the railing at an inconsistent height. A rail that rises and falls unexpectedly along the stair can feel uncomfortable and may fail to meet applicable requirements. Establish accurate reference points and check the alignment at multiple locations.
Skipping the stability check. A railing that looks correct can still have loose connections. Check the mounting points and fasteners after assembly. Remember that a manual check does not replace a required structural assessment or formal inspection.
Using the wrong fasteners. Fasteners must match the substrate and required loads. Structural screws for timber framing are different from approved masonry or concrete anchors. Do not substitute one fixing type for another without confirming its suitability.
Ignoring infill spacing or glass requirements. Baluster spacing, glass specifications, and supporting hardware are safety considerations, not just design choices. Check the applicable requirements before installing the infill.
Các câu hỏi thường gặp
What is the standard height for a stair railing?
There is no single global standard. Handrail height is commonly measured from the line connecting the stair tread nosings to the top of the gripping surface, while guardrail height is measured from the applicable adjacent walking surface. The permitted range and measurement method depend on your country, building type, and the code edition adopted in your area. Confirm the requirements for your specific project before installation.
What is the difference between installing a stair handrail and a stair guardrail?
A handrail provides a graspable surface for support and balance. A guardrail prevents falls from an open side of a staircase or elevated surface. They have separate height, infill, and load requirements. Some staircases require both, and a single railing system may serve both functions only if it meets the requirements for each.
What is the process for putting up a stair railing on open stairs?
Open stairs generally require a railing system supported by the stair structure, floor, or other suitable structural elements. Depending on the staircase design, this may include post-mounted, side-mounted, or other engineered railing systems. The supporting structure must be capable of transferring the required loads, and the handrail and guardrail requirements must be considered separately.
Can I do the work of putting up a stair railing myself?
Some straightforward railing installations may be manageable for homeowners with suitable DIY skills and the right tools. However, the project involves structural connections, code requirements, and safety-critical dimensions. If your staircase is complex, if you are unsure about the wall structure or anchoring method, or if the project requires a permit, engineering approval, or inspection, professional installation is the safer choice.
How far apart should handrail brackets be?
There is no single spacing that applies to every installation. Bracket spacing depends on the handrail material, bracket design, rail length, and manufacturer’s instructions. Brackets are commonly placed near the ends and at intervals along the span, but the specific spacing must follow the product requirements and structural conditions.
Do I need to find studs to install a wall-mounted handrail?
Not necessarily. The important requirement is to secure the handrail brackets to a suitable structural substrate. For timber-framed walls, this usually means locating the studs or additional structural blocking. For concrete, masonry, or other solid walls, use anchors specifically designed and approved for that substrate and the required loads. Drywall alone is not a suitable structural anchor for a safety-critical handrail.
Can I install glass railing infill myself?
Glass railing installation involves a supporting base system, safety glass, appropriate fixing hardware, and specific code requirements. Some systems are designed for DIY installation, but the supporting structure must be suitable, the base or fittings must be correctly anchored, and the glass must be installed according to the system specifications. If you are unsure about the anchoring, glass selection, or structural requirements, professional installation is recommended.
How do you replace a handrail on stairs?
Start by removing the old handrail, brackets, and any infill or components that need replacement. Inspect the mounting points because old fasteners may have enlarged holes or damaged the surrounding material. Measure the old railing’s length and angle as a reference, but verify them against the new system’s requirements. Do not assume the existing installation met current requirements.
Can you install a stair railing without removing the existing posts?
In some cases, yes. Existing posts may be reused if they are structurally sound, correctly positioned, undamaged, and compatible with the new railing components. However, they must be inspected for stability, correct height, and suitable connections. A new handrail attached to inadequate posts will not be secure.
Can stair railing systems be custom-made for different staircase layouts?
Yes. Stair railing systems can be custom-made to suit different staircase widths, slopes, landing turns, material combinations, and fixing structures. These details affect the railing design, component dimensions, and installation method, so they should be confirmed before production.
If your project involves a non-standard staircase layout or a specific combination of materials, contact the Meizstairs team to discuss the available custom options and the information needed to plan your railing system.
Kết luận
Putting up a stair railing involves a series of connected decisions: choosing the right system, confirming the structural support, measuring and marking the installation points, selecting suitable fixings, positioning the infill, aligning the handrail, and checking the completed assembly.
The details vary with the staircase layout, wall or floor construction, railing material, infill choice, and local building requirements. However, the overall process of putting up a stair railing remains the same: plan carefully, use components suited to the supporting structure, follow the manufacturer’s installation instructions, and verify that the finished railing meets the requirements for its intended use.
For more information about handrail materials, styles, and components, explore the Meizstairs Ultimate Guide to Handrails. You can also read our guides to Adjustable Handrail Brackets, Brass Brackets for Handrails, and Oak Handrails.
Ready to choose your railing components? Explore Meizstairs handrail and bracket collections, or contact our team to discuss a railing system suited to your staircase layout, materials, and project requirements.